29 July 2013

Panda Nails


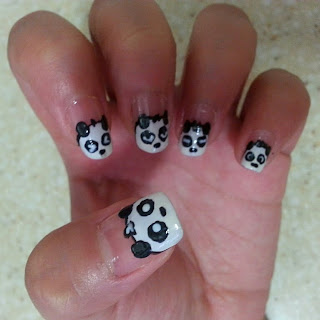
Hey guys, today I'm going to show you how to create these cute panda nails.

Nails colors: Black and white
Tools: Dotting tools

With a white polish, create a rounded french tip covering about half of your nail.

Using a medium point dotting tool and with a black color, make 2 dots representing the ears.

Using a very small point dotting tool, carefully create the outlines of the panda's head.


Using the same medium point dotting tool, create another 2 dots for the panda's eyes. Do note that it should be a little bit bigger than the ears.

With a small point dotting tool, add another dot for the nose but this time make a very small oblong instead of a round shape.

Using a small point dotting tool, add the eyeballs using a white nail color.


Do the same to the other nails. Once they're completely dry, add a layer of top coat and your done.

Note: You can make different eye shapes to show different facial expressions.


Have fun! :)

27 July 2013

Minions Nail Art

The minions are back!!! These cutie little rascals are sure to make you smile.


Now, I'm going to try to do this super cool and fun nail art. So, let's start.

Materials used: (Nail color) yellow, blue, black, white and silver. (Nail tools) dotting tools and striper brushes.


After applying a layer of base coat, paint your nails with two coats of yellow and let it dry.

With a blue color, create a french tip on each nail.


Using a striper brush and a black nail color, add a thin line where the yellow and blue color meets. Create the pockets of the minions' clothes by adding a squarish-like shape in the middle of the blue french tip part then add a small dot to represent the button.

With the same striper and nail color, create a thicker line in the middle of the yellow area.


With a dotting tool and a silver nail color add dots to represent their glasses. Then for the eyes, add smaller dots using a white nail color overlapping the silver dots. Make sure to leave a silver outline.


With a black color on a smaller dotting tool, add dots to complete the eyes.

Using a striper, create a straight or wavy lines for the mouth. You can also add some very short thin lines to represent their hair.


Lastly, add a layer of top coat and that's it...

Have fun! :)

Nail Foils


How to apply these nail foils? Hmmm... This is also my first time to try these stickers. They say it's the same with the water decals, just skip the water part. So, let's see how it goes...

Gently remove the thin layer of nail foil sticker using a nail pusher or a tweezers.


Position it carefully on your nails then press it firmly to make sure it sticks properly and to avoid air bubbles.

Using a nail file, remove the excess sticker by slowly filing it downwards.


Do the same procedure to the rest of your nails.


Add a layer of top coat and you're done...


Have fun!! :)

14 July 2013

Velvet nails


Let's try something different this time. How about playing with texture? That's right! I'm gonna experiment with what they call, Nail Flocking. This will result to a velvet nail art. So let's start. :)


Materials:
  • Nail flocking powder
  • Nail polish
  • Top coat
  • Tweezers
  • Nail fan brush
  • Sheet of paper

After applying a base coat, apply two coats of nail polish. Make sure that the color you will use is similar or close to the color of your nail flocking powder.


Apply top coat to the area of the nail where you want to put the flocking powder. On a clean sheet of paper and with a tweezers, apply a generous amount of nail flocking powder.


Gently press the powder on the nails so that it sticks on the nails.


Do the same to the rest of the nails.


Clean and remove the excess powder by using a nail fan brush and you're done. 


Have Fun! :)

11 July 2013

Matte Nail Art Water Decal


Water decal nail art is the easiest form of nail art for me. They are fast and super easy to apply. One set of these stickers normally has 12 pcs (2 extras if in case they rip or tear).

Cut the sticker into strips.


Dip into a glass of water for about 10 seconds.


Peel off the back sheet and position it in your nails. Use tweezers to help you position it better.


Gently pat it with a dry tissue to remove the excess water.


Add a thin layer of top coat and let it dry.


Using a nail file, trim the excess sticker by filing it downwards.


Add another layer of a glossy top coat or you can also use a matte top coat to give you a different look and texture.


Have fun! :)

Cupcake Nails

Cupcake on nails??? hmmm seems complicated but it's actually simple. I'll show you how.


After cleaning your nails, be sure to put on your favorite base coat.


Create a french tip on every nail, I've used a purple color.


Using another nail color, apply thin straight lines on the purple french tip area.


Then with other nail colors, create a cloud like style above of the french tip.


Lastly using a contrasting nail color, add dots to create the sprinkles & cherries. After drying, use your favorite top coat and you're done. 


Have fun! :)

Choco Chip Nails


Here's another fun and easy nail art. I've used essence color & go nail polishes (Iced Strawberry Cream & Wanna Say Hello) and different dotting tools.

Photos below are the step-by-step guide to create this choco chip nails:


Finished look:


Have fun! :)