

Time for a new nail design again guys. It's my 3rd nail art theme this christmas season and this is the "Santa Nails".
Let's begin.
Here are the brushes I've used for this design.
 |
| From top to bottom: Short striper brush, flat brush, thin small brush, big, medium and small point dotting tool |
After a layer of base coat, I painted 2 coats of white nail polish (Essie: Blanc) on every nail except the thumb which I painted with a very light nude color (Essence Nude Glam: Cotton Candy).
 |
| Face it Base Coat, Essence Nude Glam: Cotton Candy, Essie: Blanc |
Moving forward to the Santa robe, here are the nail polishes I've used:
 |
| Essence: Fame Fatal, OPI: Black Onyx, Essie: Good As Gold, Etude House Shimmery Clear Polish |
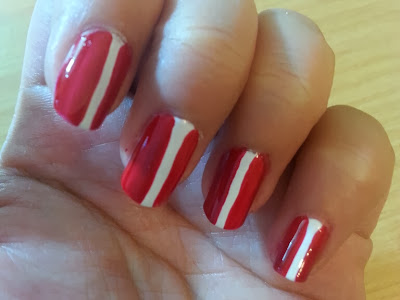
With a red nail polish (Essence: Fame Fatal), I made a vertical line on each side of the nail leaving a small portion of a white color in the center.

On a clean sheet of paper, I placed a drop of a black polish (OPI: Black Onyx). Then, with a striper brush, I made a horizontal line across the lower part of my nail.

Next, I placed a drop of a gold polish (Essie: Good As Gold) on the same sheet of paper that I've used before. Then, with a flat brush, I created a square on the center of the black line. After that, I added a small line from the center connecting to the right side of the square.

After making sure that they are dry, I added a layer of the Etude House Shimmery Clear Polish.

Moving on to the last nail (thumb part), I did Santa's face. Here are the nail polishes I've used.
 |
| Essence: Fame Fatal, Essie: Blanc, OPI: Black Onyx, Essence: Free Hugs, Etude House Shimmery Clear Polish |
I painted the top 1/3 part of my nail with a red nail polish (Essence: Fame Fatal).
Using a medium point dotting tool, I added some connecting dots below the red polish with a white nail polish. This is now Santa's hat.

Using a bigger point dotting tool, I placed 2 dots on the lower center part of my nail.
Then with a small thin brush I connected the center dots to Santa's hat (To do this, make a curved line from the center going to the side and upwards until you reach the hat part).
After that, I filled the tip of my nail with the same white polish. Now I have Santa's beard.

Using a big dotting tool, I added two dots of a black nail polish on the center of my nail above the beard. Then, with the smallest dotting tool and a white polish, I added a small dot on the lower part of the black dot.
Almost done!
Using the same small point dotting tool, I made an oblong-like shape below the eyes to create a blushed cheeks. I've used a pink polish to do this (Essence: Free Hugs). Then with the same red polish that I've used earlier, I placed a small red dot on the center touching the beard part to create Santa's nose.

Lastly, I've sealed it with a layer of the Etude House Shimmery Clear Polish.


Have Fun!! :)
No comments:
Post a Comment